The Solar Powered 9 Volt Battery Charger that Perfect First Time Project!
Solar Powered Battery Charger for anyone just starting out learning about electronics and or solar power and solar panels this would make a fantastic first time project.💚
Local Solar rooftop Spain Costa Blanca
Solar rooftop save energy and money observations from a questionnaire placed on a group placed in La Marina on the Costa Blanca

From a posting on facebooks La Marina info group
Solar Powered Battery Charger
Solar Powered Battery Charger for anyone just starting out learning about electronics and or solar power and solar panels this would make a fantastic first time project.
You’ll be making your own battery charger to keep your 9 volt batteries charged for your multimeter and charging your multimeter batteries for FREE which will ultimately save you money for other awesome electronic goodies down the road!
Mini Golf Courses
Solar Powered Battery Charger.
Did you know that solar panels typically last 30 or more years? This first time project will truly pay off for many years to come!
Let’s get started! Solar Powered Battery Charger
Important Note:Make sure your multimeter uses 9 volt batteries, most do, but some don’t.
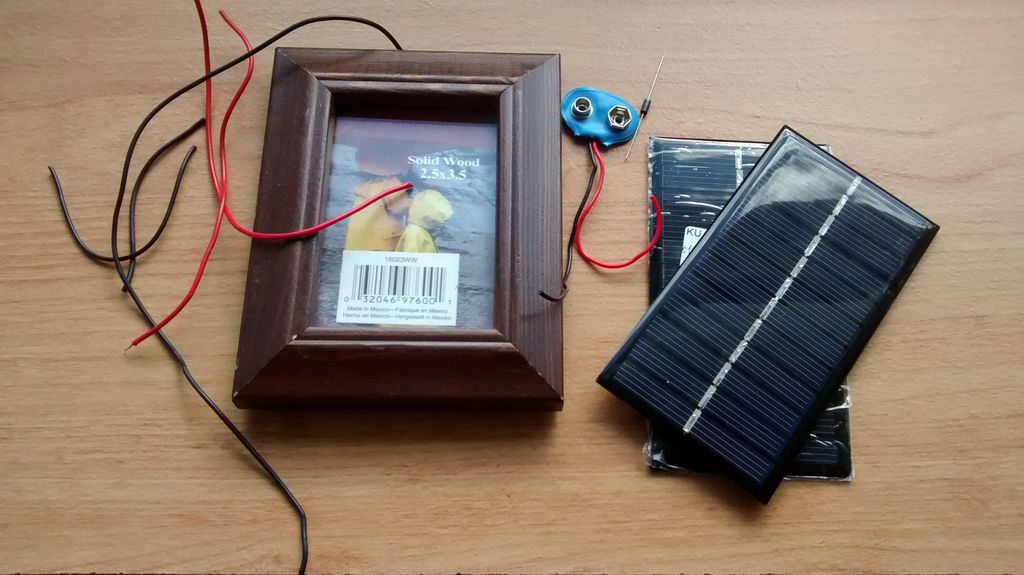
Materials That Will Be Used:
* 2 – 6 volt / 1 watt solar panels. I found mine on eBay for $0.99 each (free shipping)Total project cost: $1.98
* a small picture frame. I had a 2.5 x 3.5 inch frame laying around but you can find one at the dollar store for a buck. Our solar panels will measure approx. 4 3/4 x 4 1/4 inches when finished.
So if you cannot find a 2.5 x 3.5 inch frame (like the one I had laying around collecting dust) a 3.5 x 5 inch frame would surely do the trick such as this one found at a Dollar Store. (Don’t go ordering a whole case though… unless you need that many frames.
Just wait until you need some more toilet paper, dish soap… whatever, and head to your local dollar store to pick one up.)
Important Note: make sure the frame you use is not made out of metal or anything else that may be conductive – I recommend wood or plastic frames only. Heck, save the buck and get creative with some cardboard if you’d like! Total project cost: $1.00
* Some scrap electrical wire. I salvaged mine from a broken toy that my kids forgot about a long time ago. This stuff can be found in abundance. Other places to look: any broken electronics such as DVD players, kids toys, broken computer, old USB cables you don’t use or need, those cheapo headphones they give you for free when you buy a new cell phone that you likely threw into a junk drawer “just in case”… well… “just in case” has arrived!
* 1 – 9 volt battery connector (I salvaged mine out of an old stud finder that didn’t work anymore). You can order these connectors from eBay if you have nothing to scrap this from – I’ve found them on eBay for $0.97 for 10 (free shipping). Total project cost: $0.10
1 diode (1N4001 will be perfectly fine for this project): I’ve found these on eBay for $0.99 for 50 (free shipping). Total project cost: $0.02
* Rechargeable 9 volt battery (I’ve not included the cost of this as it is not part of the charger itself). I recommend you buy a brand you trust.
Total Material Cost: $1.98 to $3.10 depending on how much you’re able to salvage and re-purpose from around the house
Tools of The Trade That You’ll Need: for your Solar Powered Battery Charger
1 Multimeter
2 Soldering wire
3 Soldering iron
4 Wire stripper
5 Hot glue gun (with hot glue of course)
6 Electrical tape
The solar panels you ordered are likely coming from another country (and possibly other items you’ve ordered as well).
There will be a wait. The rest of this tutorial assumes that you know how to use a soldering iron, wire stripper, and hot glue gun. If you do not know how to use these here are some links to get your familiar with them:
Once you have everything, let’s move on to Step 1.
Step 1: Assembling Your Solar Panels.


We will need our solar panels to produce more than the 6 volts they are rated at in order to charge a battery rated higher than the panel. In this case, we want to charge a 9 volt battery but our panels are only able to produce 6 volts each.
To do this we will be wiring our two 6 volt solar panels in series. This will “tie” the two solar panels together to combine their voltage ratings.
In this case we have two 6 volt panels so connecting them together in series will increase the voltage they can produce in full sun to 12 volts. This will be enough for our needs for this project but not so much excess voltage that it will cause a danger.
Click below
Read Solar Charge Controller Basics to learn more about why we don’t need a regulator or charge controller for this project. This solar charger we are building is a trickle charger rated at: 12 volts – 1 Watt – .083 amps – this guy is slow, but unless you’re using 9 volts a lot (few people do these days) it’ll do the trick just fine for our needs.
To learn more about connecting multiple solar panels (and what wiring in series means) I recommend this video. It’s short, sweet, and to the point for someone just starting out. Solar Panels – Parallel and Series
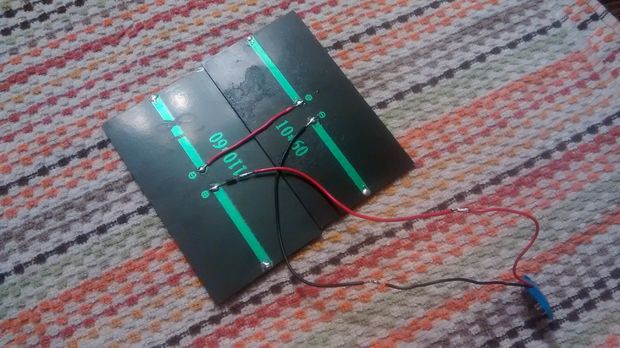
Since we’ll be assembling in series, we will solder the ground (or negative) of one panel to the positive of the other panel as shown in the first picture.
Then we will solder a wire to the remaining ground of the other panel as shown in the second picture.
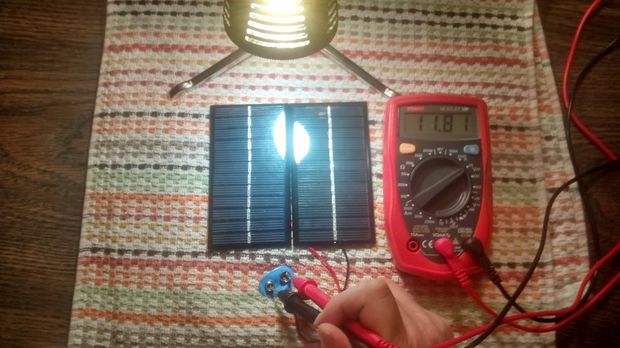
Step 3: Test Your Solar Panels.
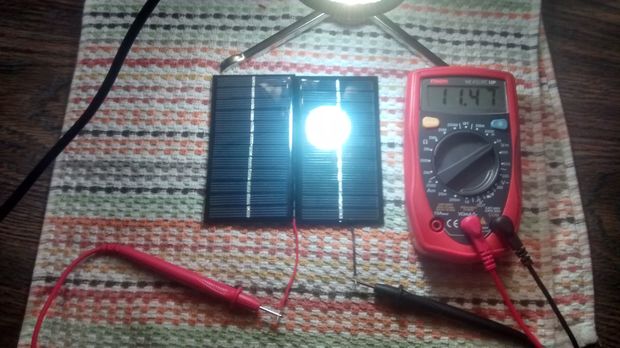
Take your solar panels out into the sun and test to make sure everything is working. We’re looking for a relatively sunny day and that when you test with your multimeter the panels are producing something close to 12 volts.
When I came to this part of the project it was dark outside so I simply placed a lamp close to the panels as shown in the image.
Still new to using a multimeter? Check out this quick basic tutorial that will teach you the basics of using your multimeter: THE BEST Multimeter tutorial
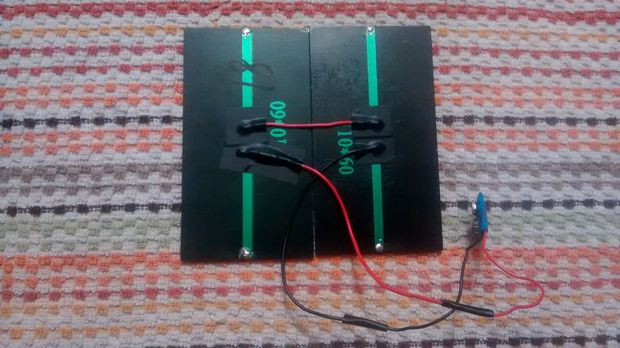
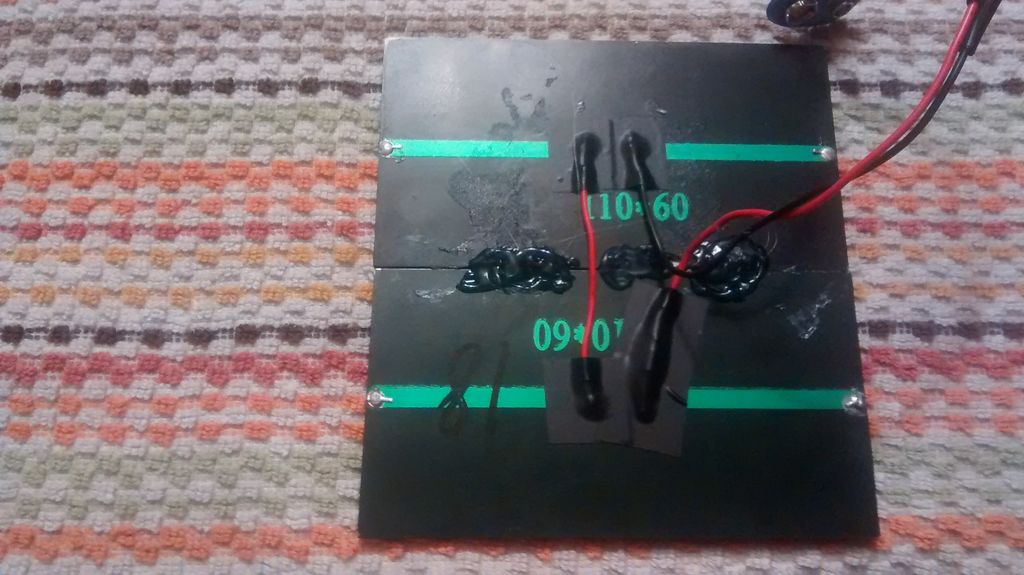
Step 4: Connect Your 9 Volt Battery Connector.
Solder the positive wire from your solar panel to the positive wire of your battery connector. Do the same for the ground wire as shown in the picture.
Step 5: Prevent Accidental Short Circuits.
We will need to make certain that at no time the positive and ground wires touch each other (this creates a short circuit).
Cover all the areas with exposed wire with electrical tape as shown in the picture. Short circuits are dangerous, can cause fires, and possibly even cause your battery to explode. You definitely don’t want that! This is a very important safety step!
Step 6: Test Your Solar Powered Battery Charger Again, Just to Be Sure.
Follow the same steps in step 3 to test that our solar panels are connected and working correctly (this is really to make sure we didn’t get a dude 9 volt battery connector before we keep going).
This time test the battery terminals with your multimeter as shown.
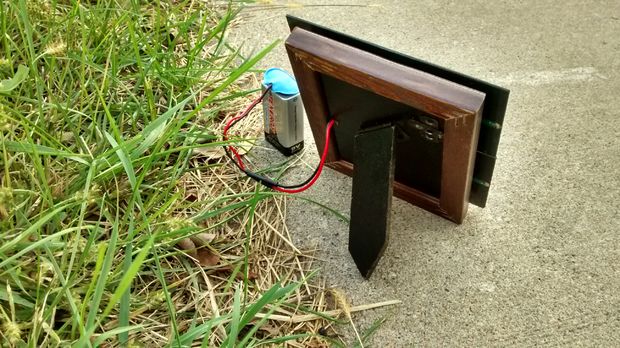
Step 7: Attach Your Solar Panels To Your Picture Frame.
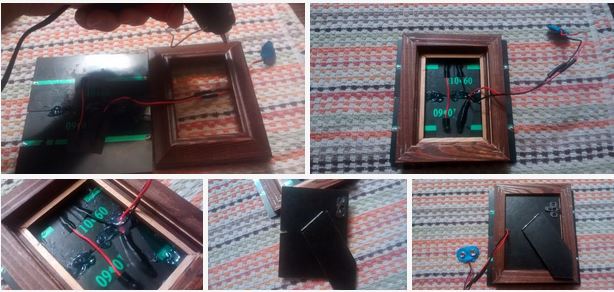
Remove the back, the awesome generic family picture, and glass from your picture frame. You can throw away or re-purpose the glass and generic family, but keep the frame handy and we’ll be using the backing soon as well.
Hot glue along the middle of the back seam of your solar panels to keep them together as shown in the first picture.
Place your solar panels face down next to the the frame making sure your battery terminal and wires go through the center of the picture frame. Hot glue around the outside of the picture frame as shown in the second picture. Try to do this as quickly as possible and firmly press the glued part of your frame to the backside of your panels as shown in the third picture.
Hot Glue
I added some hot glue to the wires that we will feed out of the back of the frame to prevent them from being pulled as well as a little bit of extra hot glue in the corners just to help make sure our panels are anchored nicely as shown in the fourth picture.
Cut a small slit into the backing of the picture frame to allow your wires through as shown in the fifth picture.
Gently slide your wires through the slit as you replace the backing of the picture frame as shown in the sixth picture.
Step 8: Test Your Solar Powered Battery Charger One More Time.

We’re going to test our solar charger one more time just to be certain nothing was pulled or damaged while we mounted the panels onto the picture frame before we connect a battery to it. Better to be safe than sorry. Follow the same procedure as Step 6.
Step 9: Test Drive Your New Solar Powered Battery Charger.
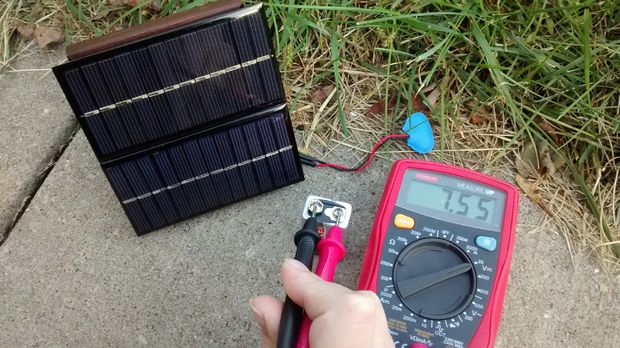
Make sure your rechargeable battery isn’t fully charged. Check the voltage of your 9 volt battery with your multimeter. Make note of the reading. Place your solar battery charger in a sunny location.
A southern facing window would be perfect. Connect your battery to your solar charger.
Wait about 45 – 60 minutes (remember this charger is slow.) Disconnect your battery and recheck the voltage of the battery. If the number has gone up, congratulations! You’ve successfully made yourself a solar charger for your multimeter/9 volt batteries!
Final Important Note: Check the charge on your battery frequently. Once charged remove the battery from the solar panel. Never leave the battery connected after it’s been fully charged.
Step 10: Storing Your Solar Battery Charger & Final Thoughts
When not in use I recommend that you cover the panels with a cloth to prevent them from being scratched and store in a dark location. Storing this is a dark location will extend the life of your panels.
So just how slow is this charger? Well… very slow. Actually, something along the lines of molasses verses cheetah slow.
Don’t expect it to charge your batteries anywhere nearly as quickly as a wall charger. But hey!
It’s free energy supplied to your batteries and unless you’re using 9 volt batteries a lot it’s likely worth the very small investment and experience.
You’ll have a charger that will last for many, many years to come without relying on your power company to charge them. You’ll also be doing a service to our planet all for a very minimal investment; less than the cost of a wall charger and you can impress people when you tell them you made it for only a couple bucks!
Solar Powered Battery Charger
My Speed Results:
After more than a week of very cloudy weather I finally had a nice sunny day to test out how fast (or slow) this charger is. I put it in a sunny window. (I don’t leave my panels outside, I’m always afraid someone might think it’s neat and steal it!) Having said that keep in mind I’m charging through a screen window and glass that I really need to consider cleaning! Here’s my results:
8:15 a.m. – The morning sun was finally starting to peaked over my neighbors house, there’s also a bit of trees that block the sun a bit as it rises from this location – Sunny/No clouds – battery was at: 7.55 volts
9:15 a.m. – Sun was behind a few branches, nothing major – Sunny/No clouds – battery was at: 7.58 volts
10:15 a.m. – No more tree branches – Sunny/No clouds – battery was at: 7.60 volts
11:15 a.m. – Sunny/No clouds – battery was at: 7.63 volts
12:15 p.m. – Moved to southern window at noon – Sunny/No clouds – battery was at: 7.69 volts
1:15 p.m. – Sunny/No clouds – battery was at: 7.83 volts
2:15 p.m. – Sunny/No clouds – battery was at: 8.01 volts
3:15 p.m. – Sunny/No clouds – battery was at: 8.27 volts.
Solar Powered Battery Charger.
Spain Info, Solar Powered Battery Charger 11 April 29 Aug 30 F H 77
San Francisco De Asis, Urb Marina, San Fulgencio, 03177, Alicante, Spain.
Site Disclaimer
Disclaimer: Whilst every effort has been made to provide accurate information, no liability will be accepted for misinterpretation, misrepresentation, errors or omissions - the information provided by our Websites is for use as a guide only and is issued in good faith as information..
All photographs images and FILM material is subject to the understanding that as they are in the public domain they can be used and shared as seen to be appropriate and unless showing a sign that they are covered by copyright law. This also covers Social media operations.
1999---2026